Today we are going to talk about cutting the felt pieces for your Golden Lion Tamarin using the freezer paper method. This is my favorite way to cut felt.
We are also going to cover getting the ribbon in place today.
Day 1 of the sew along we discussed all the materials you would need for making your monkey. From that list we're going to need our scissors, 4 felt colors, the printed out template, freezer paper, a writing utensil (pencil recommended), an iron and ironing board. If you are going to be putting ribbon in your monkey you'll also need that, a little thread, and a ruler might also be helpful.
Lets's get started!
Now that you've got all your materials for cutting the pieces of your golden lion tamarin. The first step in making your felt monkey is getting the pieces cut.
To start grab your printed out template for the size monkey you want to make. As I mentioned in the Sew Along Day 1 the PDF pattern has templates for 3 different sized monkeys. For the sew along I'll be making the 4 inch monkey.
You'll also need enough freezer paper for all your shapes and a writing utensil. I prefer pencil. I find a lot of pens tend to smudge on freezer paper and get all over your hands.
Freezer paper you'll notice has 2 sides: a shiny and a non shiny. You want the non shiny side facing up. You'll be tracing on the non shiny side.
Freezer paper is quite transparent. Place your freezer paper non shiny side up over your template. Trace the template shape on to the freezer paper.

Freezer paper is quite transparent. Place your freezer paper non shiny side up over your template. Trace the template shape on to the freezer paper.
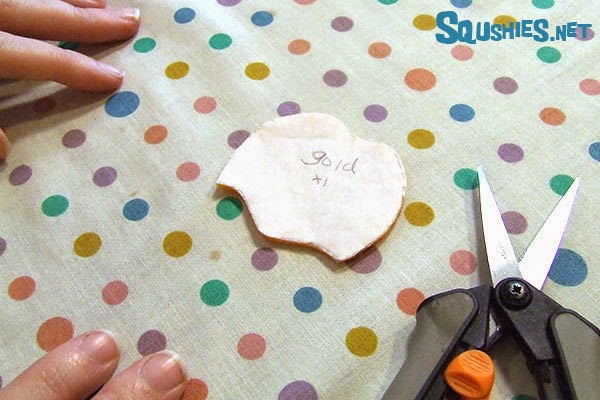
I often write the color and how many I'll need of a particular shape right in the center of my traced shape so I don't have to keep referring back to the template as I'm cutting.

Now set up your iron and ironing board. You'll need your iron to be on a low setting, something safe for polyester. We find our iron works best on a setting of 3, but every iron is different. You don't want to use too high of a heat setting because it will melt your felt.
Place your traced template shape non shiny side up on the felt. Run the iron over the shape lightly a couple of times.
Now take your scissors and cut the shape following the line you traced on the freezer paper. If the freezer paper starts to peel up before you are done cutting the shape, just run the iron over it to make it stick again.
Yay! You've got your first shape! Repeat the steps for all the pattern shapes you traced until you have all the pieces for your monkey.
Once you are done cutting a shape you can easily peel off the freezer paper. Freezer paper shapes can be re-used a few times to cut more shapes before they start to loose the ability to stick.
There are many different ways to cut felt. You can cut out your pattern pieces and trace them directly on the felt with a pen or marker. You can cut out the pattern pieces, pin them to the felt, and then cut out the shapes.
I use freezer paper to cut out all my felt shapes. Using freezer paper is a bit more involved than other methods since it requires an iron and ironing board but I find I get the best results using this method, especially for cutting out some of the tricky more fiddly bits.
Now we are going to put our ribbon in place. Looking at the finished monkey you'll see a large grey face shape on the head. We're going to hide our stitches for the ribbon behind that face shape. If you are making the 10 inch monkey you might want to skip the ribbon.
I've been making felt ornaments for a few years now and I've found that I like to use somewhere around 10 inches of ribbon. You can eyeball the ribbon to a length you think looks nice or measure it out. If eyeballing your ribbon, keep in mind that you'll be folding it in half.
Once you've cut your ribbon, fold it in half and place the cut ends in the center of the head. This will be the back of the head piece, also referred to as the wrong side. Make sure the ribbon isn't bent or twisted before the next step. You want it to form a nice loop.
You don't need a lot of thread to secure the ribbon. I do a lot of hand sewing so I accumulate many short pieces of thread. They're too short to sew any pieces on the felt animal but many of them are great for securing the ribbon.
Take a short piece of thread (just a few inches) and go through the ribbon and the back of the head to the front. Then go through the front of the head, to the back and through the ribbon.
Keep going through the back of the head to the front and then from the front to the back a few times. Make sure your stitches always go through the ribbon. Making a small x shape works nicely, but these stitches don't have to line up or be pretty. They'll be inside your ornament where no one will ever see them.
Once your have 4 or 5 stitches and the needle and thread are on the ribbon side of the face slide your needle and thread under some of the stitches you just made. You don't want to go through the felt at all at this stage, just under the stitches. After you go under the stitches, but before you pull everything tight your thread will form a loop, put the needle through the loop and then pull tight to form a knot. Get your scissors and cut the extra thread, living a tiny tail. Your ribbon is secured and in place!
Our next sew along post is going to focus sewing the face in place and introducing the double running stitch.
The Golden Lion Tamarin pattern is available for purchase here.


